Quick answer: A full-button baseball jersey needs artwork planned around two overlapping front panels. A centered logo on a flat drawing is not enough. Check the design with the placket closed, then approve a physical sample with the chest lettering, connecting strokes and button positions visible.
Why a good drawing can become a broken word

The placket is the finished opening that carries the buttons and buttonholes. Its layers overlap when the jersey is fastened. Part of a printed graphic can therefore sit on a visible panel, disappear beneath an overlap or fall directly under a button. If a designer treats the front as one uninterrupted rectangle, the finished word can look shortened or disconnected.
The problem becomes easier to notice with sweeping script, circles and diagonal strokes. A small vertical displacement may be inconspicuous in an abstract texture but obvious in the middle of a letter. Printed pinstripes create another reference: the eye compares their spacing with the center-front edge.
Three different things to approve
| Approval view | What it answers | What it cannot prove |
|---|---|---|
| Front artwork on the production template | Is the graphic positioned around the opening? | How the sewn garment will lie |
| Buttoned, flat sample | Do the visible portions reconnect? | Fit during throwing and reaching |
| Worn sample in the intended size | Does the front close without excessive pulling? | Consistency across every bulk garment |
Ask for a clear, straight-on photograph with all relevant buttons fastened. An angled lifestyle image is useful for presentation, but perspective can hide a mismatched join. Keep the approved image alongside the artwork revision so that everyone is comparing the same arrangement.
Give the supplier a useful alignment brief

Identify the critical crossing points rather than writing only “make it perfect.” Mark the letter stroke that crosses the center, the expected continuation of a horizontal graphic and the relationship between a chest number and a nearby button. Specify whether the team name should read as one continuous word or as intentionally separated elements.
Allow the factory to review the design on its garment pattern before approving the layout. Moving a graphic a little higher or changing the crossing point can make the result easier to control. A sample may also reveal that the front is too tight: fabric tension can pull the panels apart even if the printed pieces were positioned correctly.
Inspect the join in more than one size
A graphic that works on a large adult front may crowd the button line on a smaller jersey. Ask how artwork size and position will change across the order. This does not mean every player needs a different design; it means the supplier and buyer should agree which elements scale and which remain fixed.
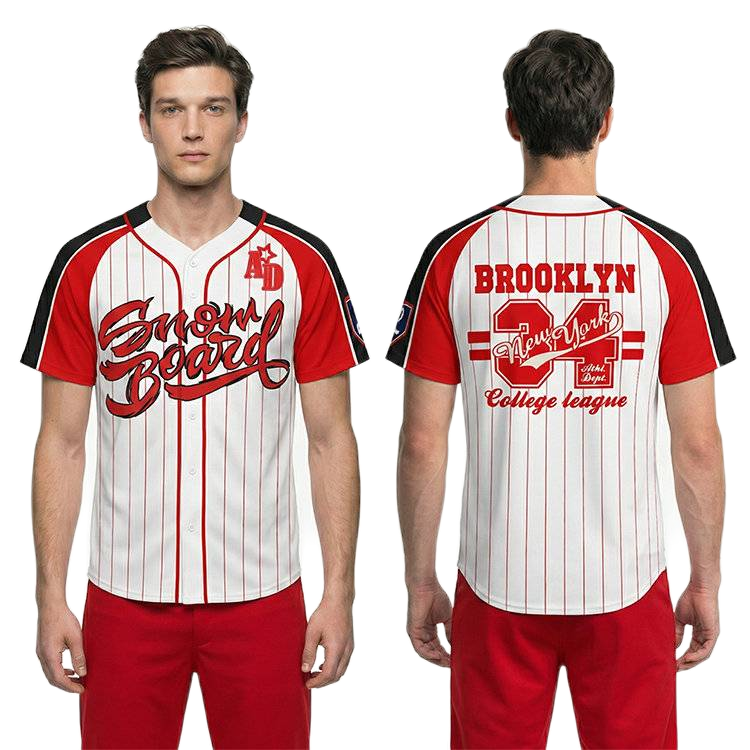
InkSportPro identifies front-pattern matching as a particular focus for its custom baseball uniforms. Its supplied red-and-white script reference illustrates the design challenge. It is a layout reference, not a measured tolerance report. Approve the actual buttoned sample and agree any acceptance limits before bulk production.
A repeatable check for baseball jersey front logo alignment
For a custom full-button baseball jersey sample, fasten every relevant button, lay the garment without stretching it and take a straight-on photograph. Identify the same crossing point in the approved artwork. Then check the worn sample separately: a join that looks correct flat but opens under chest tension needs a fit review as well as an artwork review.
Record the sample size, artwork revision, crossing point and photograph reference. Describe a vertical step in a letter, a hidden section of a stroke or unequal gaps. Ask the supplier to identify the cause before moving buttons or approving a revised print file. Changing one button may affect how the rest of the front lies.
For baseball jersey placket alignment approval, agree acceptance criteria using the actual sample and project specification. InkSportPro has not published a universal millimetre tolerance here. Save the approved reference for sample approval and the bulk quality-control discussion.
Questions buyers ask
Can a button-front design always look completely uninterrupted? No. The opening and buttons remain physical features. The aim is a deliberate, readable result when the jersey is fastened.
Should alignment be checked with the jersey open? Review both views if useful, but the closed front is the relevant reference for how the team name reads during normal wear.
What should I upload for a quote? Send the editable logo, a front/back mockup and a note marking the critical center-front join. Use the artwork-enabled quote form.
Further reading: STAHLS on decorating split-front jerseys. Its heat-printing example demonstrates the split-front issue; it is not a description of InkSportPro’s printing process.
Explore InkSportPro baseball uniforms or send a project brief with artwork.
Custom button-front baseball jerseys for your team
For custom full-button baseball jerseys, identify the lettering or stripes that cross the opening before approving the design. InkSportPro plans these joins around the fastened placket. Send a front/back reference and use the buttoned sample to confirm your agreed artwork.
Explore custom baseball jerseys and uniform options · Request a team quote with your artwork